

How I Use a Circular Polarizing Filter for Landscape Photography
A circular polarizing filter is one of those small pieces of camera gear that can make a noticeable difference in a landscape photo before you ever open Lightroom.
Using one is pretty simple. Screw the filter onto the front of your lens, compose your photo, and slowly rotate the outer ring while watching the scene through your viewfinder or LCD. As you turn it, you’ll see reflections, glare, and sometimes color change.
The more important part is deciding how much of that effect you actually want.
Photographing a lot of water in Taiwan reminded me how differently the same scene can feel depending on what you do with the surface of the water. Sometimes the reflection is one of the best parts of the photo. Other times, glare hides the rocks, color, or texture underneath.
That’s how I think about a circular polarizer in general. I’m not trying to get the strongest possible effect every time. I’m using it to help the scene look the way I want it to.
about the blog

Welcome to my photography blog, your comprehensive guide to mastering the art and science of photography. I’m Paige, ready to guide you on a journey of discovery, from capturing the perfect composition to deciphering the complexities of file formats and storage. This is where we will cover will include in-depth discussions on cameras, exploration of editing techniques, and a deep dive into photography’s fascinating world. Whether you’re a new enthusiast or an experienced photographer seeking to sharpen your skills, I’m committed to helping you elevate your craft to the next level. Welcome to your photography journey!
Subscribe For More!
Be the first to see the latest posts
Table of Contents
Share This Post
What Does a Circular Polarizing Filter Do?

A circular polarizing filter, also called a CPL, helps control reflected light before it reaches your camera. For landscape photography, I find it especially useful for reducing glare and controlling reflections on things like:
- lakes, rivers, and streams
- wet rocks
- leaves and foliage
- waterfalls
- other shiny or reflective surfaces
Reducing that glare can reveal color and texture that were already in the scene but were being hidden by reflected light. Water is one of the easiest places to see the difference. If you look at a shallow stream while slowly rotating a polarizer, you may suddenly start seeing rocks and details beneath the surface that were difficult to see a second earlier.
A circular polarizer can also affect how a blue sky looks, although that depends a lot on your position relative to the sun. I don’t think of a polarizer as something that automatically makes a landscape photo better. It’s another way to control the light in a scene, and I only want to use the effect when it actually supports the photo. If you want to understand more about how I use brightness, shadows, and the direction of light when building a composition, I go deeper into that in my guide to light and shadow in landscape photography.
How to Use a Circular Polarizing Filter (Step by Step)
The filter itself is easy to use once you understand what you’re looking for. The creative part is figuring out how much polarization the scene actually needs.
1. Attach the filter to your lens
A circular polarizing filter screws onto the filter thread on the front of your lens. Before buying one, check the filter diameter of the lens you plan to use it with. You’ll usually see a measurement such as 67mm, 77mm, or 82mm printed on the lens. If you’re curious about the rest of my setup, I also share the lenses and gear I rely on when I’m out shooting. Once the CPL is attached, the outer ring should still rotate freely. That rotating section controls the polarizing effect.
2. Compose your photo first
I usually want to have a good idea of what the photo is about before I start adjusting the filter. Look at the scene and ask yourself what matters most. Is the reflection helping the composition? Do you want to see through the water? Is glare hiding texture in the rocks or leaves? Is the sky an important part of the frame?
Once I know what I want someone to notice, it becomes much easier to decide what I want the polarizer to change. That connects closely with the way I think about focal points in photography. The technical choices should support the subject rather than compete with it.
3. Slowly rotate the outer ring
Look through your viewfinder or at the LCD and slowly rotate the front ring of the filter. You should be able to see the effect changing as you turn it. There isn’t one correct direction to rotate a circular polarizer. You can turn it either way. I simply rotate it slowly and pay attention to what happens to the part of the scene I care about. With water, for example, you may notice reflections becoming weaker or stronger as the filter turns.
4. Watch the area you actually want to change
Instead of concentrating on the entire frame at once, look closely at the specific thing you want the filter to affect. If I’m shooting a river, I watch the water. If I’m around a waterfall, I may pay attention to the wet rocks. In a forest, I might watch the glare on the leaves.
If the sky takes up a large part of the composition, I check the whole sky to make sure the effect still looks even and natural. This makes it much easier to recognize when the polarizer is actually helping.
5. Stop when the effect looks right
This is probably the biggest thing I want people to remember about using a circular polarizing filter:
You do not need maximum polarization.
Sometimes completely cutting a reflection makes the photo worse. If I have a calm lake reflecting a mountain or beautiful light, that reflection may be one of the strongest parts of the entire image. I might only want to reduce a little surface glare instead of removing as much reflection as possible. I rotate the filter until the scene feels balanced, not until the filter has reached its strongest setting.
6. Check your exposure again
A circular polarizing filter reduces some of the light reaching your camera, so it can affect your exposure. Depending on the scene, you may need to compensate with a slower shutter speed, wider aperture, or higher ISO. This becomes more noticeable as the light gets lower. If you’re still learning how those settings work together, my guide to the exposure triangle breaks down the relationship between aperture, shutter speed, and ISO.
How I Use a Polarizing Filter for Water and Reflections
Water is probably where I notice the biggest difference from a polarizer because the surface can change so much depending on the light, my camera angle, and how far I rotate the filter. There isn’t one treatment that works for every scene.
When I want to see through the water
If glare is covering the surface and I want to reveal more underneath it, I slowly rotate the polarizer while watching the water. As the reflection decreases, you may start seeing more of the rocks, sand, plants, color, or other details below the surface.
This can work especially well when those underwater details are part of the foreground or help add depth to the composition. It can also reduce some of the shine on wet rocks, which may reveal more of their natural texture and color.

When I want to keep the reflection
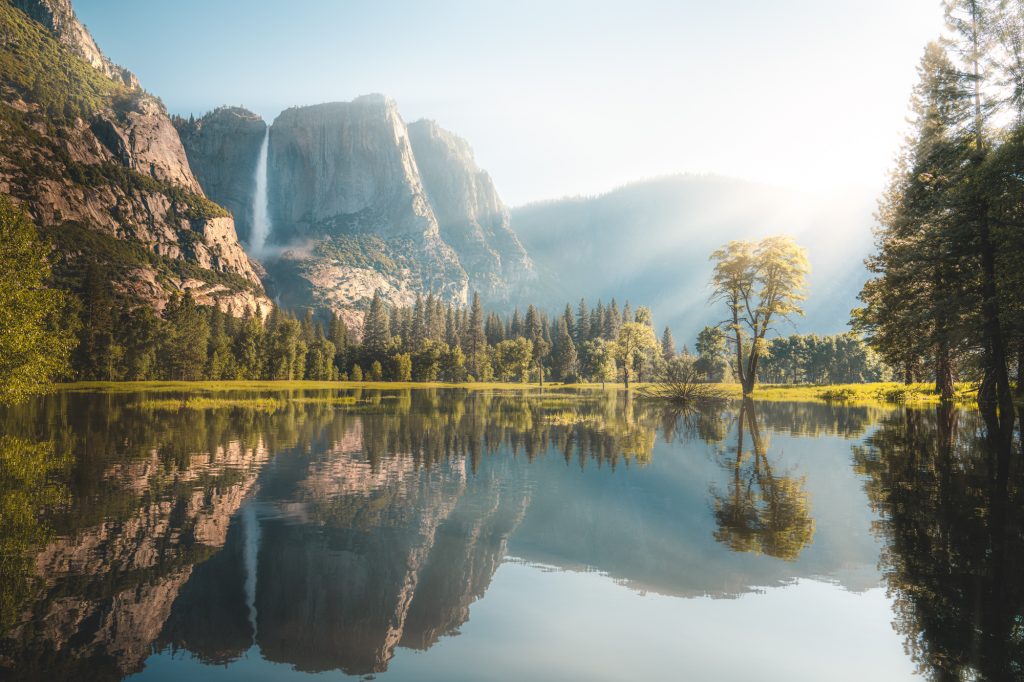
The opposite can be just as important. Sometimes the reflection is the photo. A mountain mirrored in a calm lake, trees reflected across the water, or colorful sunrise light on the surface can add symmetry, depth, and mood to the scene.
In those situations, I’m not going to remove the reflection simply because I have a filter that can reduce it. I’ll turn the polarizer slowly, compare the different looks, and stop when the reflection and the details in the rest of the scene feel balanced. If you want to work with reflections more intentionally, I have a separate guide with my reflection photography tips.

Where Else I Use a Circular Polarizer in Landscape Photography
Water is an obvious use for a circular polarizing filter, but there are several other situations where I find one helpful.


Wet rocks and waterfalls
Wet rocks can reflect a surprising amount of light. Around waterfalls or streams, reducing some of that glare can bring back texture and color that might otherwise get lost in bright reflections. A polarizer can also work well when I’m using a slower shutter speed to show movement in the water. Since the filter reduces some of the light entering the lens, it can sometimes make reaching a slower exposure a little easier.
I cover more of the creative side of slowing water down in my guide to long exposure photography.
Leaves and foliage
Leaves also reflect light, especially when they’re wet. In lush landscapes or forests, a polarizer can reduce some of that surface glare so the natural color and texture of the foliage come through more clearly. I still watch the result carefully. If reducing too much reflection starts making the scene feel overly dark or unnatural, I back the filter off.
Blue skies
A circular polarizer can also deepen parts of a blue sky, but this is one place where I’m more cautious. The strength of the effect depends on the angle between your camera and the sun. When you’re shooting with a very wide-angle lens, different parts of a large sky can receive different amounts of polarization. That can leave you with one part of the sky looking much darker than another. Whenever I use a CPL with a wide lens, I check the entire sky instead of only watching the center of the frame.
When I Don’t Use a Circular Polarizing Filter
A polarizer can be incredibly useful, but it definitely isn’t something I leave on my lens for every landscape. Sometimes the better choice is to reduce the effect or remove the filter completely.

When the reflection is helping the composition
If the reflection adds symmetry, color, depth, or another layer to the scene, I usually want to keep it. This is why I never assume that less reflection automatically means a better photo.
When I need as much light as possible
Because a polarizer reduces some of the light reaching the sensor, I may skip it when I’m already working in very low light and the polarizing effect isn’t important enough to justify the tradeoff. Removing it can help me avoid using a slower shutter speed or raising my ISO more than I need to.
When a wide sky starts looking uneven
If part of a large blue sky becomes much darker than another section, the polarizing effect can start drawing attention for the wrong reason. I would rather use less polarization than end up with a sky that looks obviously uneven.
When the filter simply isn’t improving the photo
Sometimes I rotate the filter, compare the effect, and decide I prefer the scene without it. That’s completely fine. I don’t want a piece of gear making the creative decision for me. If the photo looks better without the effect, I take the filter off. A circular polarizer should support what I’m already trying to capture.
How I Decide When a Polarizer Is Helping
Using a circular polarizing filter for landscape photography is physically simple. Attach it to your lens, rotate the outer ring, watch what changes, and adjust your exposure if needed. The part that comes with practice is knowing when to stop.
The next time you’re near water, try taking the same composition with a few different amounts of polarization. Keep most of the reflection in one photo, reduce some of it in another, and rotate the filter farther for a third. When you compare them later, you’ll start to see how much the polarizer can change the feeling of the scene.
That’s what I keep coming back to when I’m shooting landscapes. I’m not trying to use every tool at its strongest setting. I’m looking at what the scene needs and deciding whether the filter is actually helping me show it. Sometimes that means cutting glare so I can see the rocks beneath the water. Sometimes it means keeping almost all of a reflection because that’s what makes the composition work. And sometimes it means taking the polarizer off completely.
I hope this helps you feel more confident using a circular polarizing filter the next time you’re out shooting. If you’re curious how I edit my landscape photos after the shoot, you can try my free Lightroom preset or take a look at the Lightroom preset packs I use for my travel and landscape photography. And if you haven’t subscribed yet, I share more photography tips, recent shoots, and lessons from the field in The Weekly Frame.
Frequently Asked Questions
How do you use a circular polarizing filter?
Attach the circular polarizing filter to the front of your lens, then slowly rotate the outer ring while watching the effect through your viewfinder or LCD. I usually focus on the reflection, glare, or sky I want to change and stop rotating when the scene looks balanced rather than automatically using the strongest effect.
Which way do you turn a circular polarizing filter?
You can turn a circular polarizing filter in either direction because there is no required clockwise or counterclockwise setting. Rotate it slowly and watch how the reflections, glare, or sky change until you reach the amount of polarization you want.
When should you use a circular polarizing filter?
Use a circular polarizing filter when you want to reduce glare, control reflections, or reveal more color and detail in water, wet rocks, and foliage. I find it especially useful around water, but I only use it when the effect actually improves what I want the photo to show.
Does a circular polarizer remove reflections from water?
A circular polarizer can significantly reduce reflections from water, although the amount depends on the light and your shooting angle. I rotate the filter while watching the surface and decide whether I want to see more beneath the water or keep some of the reflection as part of the composition.
Can you use a polarizing filter with a wide-angle lens?
Yes, you can use a polarizing filter with a wide-angle lens, but it can create uneven polarization across a large blue sky. I always check the entire sky while rotating the filter and back off the effect if one area starts looking noticeably darker than another.
Do circular polarizing filters reduce light?
Yes, circular polarizing filters reduce some of the light reaching your camera sensor. You may need to compensate with a slower shutter speed, wider aperture, or higher ISO, especially when you’re already shooting in lower light.
When should you not use a polarizing filter?
Avoid or reduce a polarizing filter when you want to preserve reflections, need as much available light as possible, or the effect makes the sky or scene look unnatural. If the filter isn’t helping the photo I’m trying to make, I’d rather take it off.
What are common mistakes when using circular polarizers?
Common mistakes include using maximum polarization automatically, removing reflections that actually help the composition, ignoring uneven skies with wide-angle lenses, and forgetting that the filter reduces light. I treat the polarizer as something to adjust for each scene rather than a filter that should stay at its strongest setting all the time.
about the blog
Welcome to my photography blog, your comprehensive guide to mastering the art and science of photography. I’m Paige, ready to guide you on a journey of discovery, from capturing the perfect composition to deciphering the complexities of file formats and storage. This is where we will cover will include in-depth discussions on cameras, exploration of editing techniques, and a deep dive into photography’s fascinating world. Whether you’re a budding enthusiast or an experienced photographer seeking to sharpen your skills, I’m committed to helping you elevate your craft to the next level. Get ready to transform your passion into prowess, one click at a time. Welcome to your photography journey!
Share This Post
Subscribe For More!
Be the first to see the latest posts
More Photography Posts


What I use as a Professional Photographer – Camera Gear
Camera gear is a bottomless black pit that will suck up all your money… What do I use and why do I love it? Don’t buy things you don’t need.

Shooting In Raw – Understanding Bit Depth and Dynamic Range
Don’t just do it, understand why you do it! The answer to your editing struggles might be in your file type.